Motool Slacker, the ultimate tool for suspension adjustment

Why You Need the Motool Slacker for Perfect Suspension Setup
If you know me well, you know that when it comes to motorcycles, nothing excites me more than suspension tuning.
After experimenting with all sorts of “black magic” (and maybe some chicken sacrifices and voodoo dolls), I realized that suspension tuning is way more fascinating than I initially thought. Back when I believed mixing SAE 5W with SAE 10W gave me SAE 7.5W, and the leftover oil was just for my salad, I had no idea what I was missing.
The Motool Slacker: A Game-Changer for Suspension Setup
A few years ago, I watched a demo video of the Motool Slacker digital sag scale. I couldn’t resist ordering one to test it out and show you how it works firsthand.
This tool is invaluable for workshops looking to optimize their suspension services. But even if you’re a rider who frequently adjusts your settings from track to track, or you’re just as obsessed with suspension as I am, the Motool Slacker is an absolute must-have.
What Does the Motool Slacker Do?
The Slacker provides an instant measurement of your current sag, or travel percentage from the total wheel travel, without the need for calculations. No adding, subtracting, or complex formulas—just a digital display showing your sag measurement. From there, you can adjust preload, swap springs, or, if all else fails, set your bike on fire (just kidding, don’t do that!).
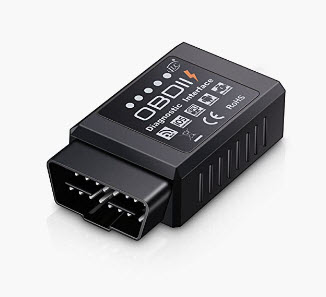
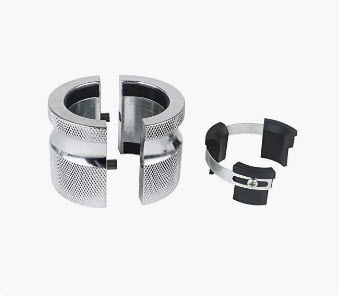
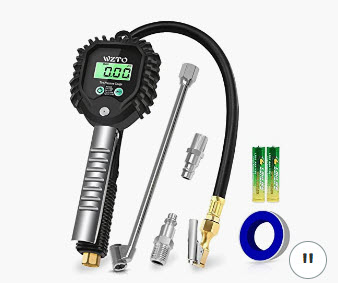
Key Components of the Motool Slacker
The tool consists of three main parts:
Measurement unit – This attaches to your bike’s unsprung mass via a powerful magnet. (Damn, it’s REALLY powerful).
Hook clamp – Secures the hook of the measurement unit to your bike.
Intially designed for MX bikes. For on-road and Adventure bikes it’s better to use the accessory clear adhesive loops.Remote display – Allows you to see the sag measurement without awkwardly twisting your neck (perfect if you’re working solo).
The measurement unit and the remote display It runs on two AAA batteries each (a total of 4 AAA).
How to Use the Motool Slacker
1. Attach the Measurement Unit
The measurement unit includes a strong magnet (be careful around watches!) that lets you secure it to your bike’s axle or another unsprung part.

In case you own a bike made with exotic materials, the kit includes a metallic bracket with a velcro strap that can be attached around the fork lower. With this bracket in place, it’s easy to attach the measurement unit. It specially works for bicycle forks.
A hooked cable extends from the unit and should be attached to a point on the suspended mass—ideally, as vertically as possible.
A hook clamp is included in the kit, allowing you to secure it to your bike’s fairing for a solid attachment point.
2. Zero Out the Measurement
Once the unit is in place, extend the suspension fully—no paddock stands touching the swingarm or forks! If needed, use the side stand to lift the bike. Press the power button, and the unit will display “0.”
For front fork sag measurements, keep in mind that forks have internal top-out springs. Step on the front rim and pull the handlebar to fully extend the fork before pressing zero.
3. Measure Your Rider Sag
Now, hop on your bike wearing your full riding gear (helmet, boots, leathers, etc.). Your equipment affects sag, so it’s crucial to measure with everything on—even if it feels a little weird doing this in your garage!
The Slacker’s display will now show how much your bike compresses under your weight. I strongly recommend to use the Slacker App on which you can enter the wheel travel and automatically shows the travel in percentage! Better than expected!
4. Adjust Your Suspension
Here’s where the real adjustment begins. For example, let’s say your rear suspension has 125mm of total travel, and you’re setting up for track riding. The recommended rider sag for this scenario is between 23-27% of total travel. If you want a balanced setup, you’ll aim for 25% sag, which means:
125mm x 0.25 = 31.25mm of sag
If the Slacker shows that your bike compresses only 17mm, that’s too stiff! You’ll need to reduce preload until the display reads 31mm. If you max out preload adjustments and still don’t reach the correct sag, you’ll need a softer spring.
Of course, the adjustment of your suspensions doesn’t end here, but this speeds up the procedure.
If you want to learn more about the secrets of suspension adjustment, don’t miss our online Motorcycle Suspension Adjustment course!

5. Detect Suspension Friction
Another great feature of the Slacker is its ability to measure suspension stiction (friction), helping you identify when it’s time to replace seals, grease linkages, or service your suspension.
If you measure only 2mm of friction, your suspension is in great shape! Quality low-friction fork seals and regular services (internal guides, oil, etc) are key to keep the friction as low as possible.
Is the Motool Slacker Worth It?
So far, I haven’t found any downsides to this tool. It’s an amazing investment for workshops, racing teams, and hardcore suspension enthusiasts like me—and probably you, if you’ve made it this far into the post.
Price: Starting at $158 (at the time of writting this post)
Sure, you can measure sag with a tape measure and two beers (one for each of your new friends helping you), but the Motool Slacker is faster, more accurate, and lets you work solo. You don’t want to carry around that pile of beer and those two new friends from track to track, do you?
Suspension tuning with friends is always more fun, but sometimes they aren’t around when you need them. That’s when the Motool Slacker becomes your best riding buddy.
Are you ready to take your suspension setup to the next level?